
Tutorials
One Twisted Tree
Dec
Instructions by Forest Rogers
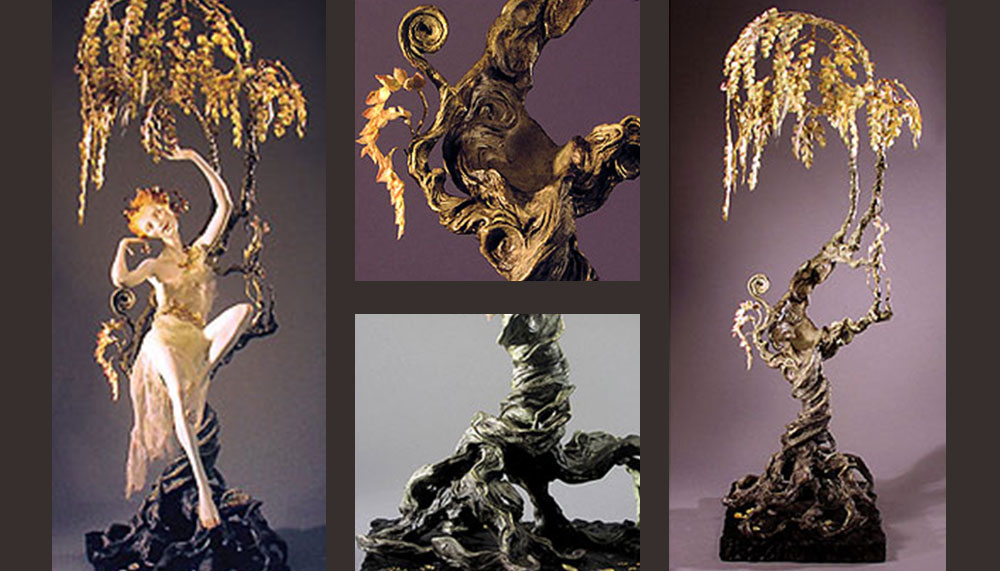
In case anyone is in need of a 24” twisted tree, I’ll summarize my approach to making one. For me, this tree helped consume those feverish days (and nights) before the New Orleans NIADA conference. It was an experiment, and better ways are likely out there… but, here’s the story:
1. If you want tree-ish inspiration, check out books on Bonsai trees. Also very fine: Meetings with Remarkable Trees and Remarkable Trees of the World by Thomas Pakenham, from Norton publishers.
2. Armature: I twisted heavy armature wire (8 or 9 gauge aluminum wire) together to form the roots and trunk of the tree. The larger the tree, of course, the heavier the appropriate wire.
Continuing from trunk to branches, I moved through lighter weight copper wire, twisting out and up from the trunk, ending with 28 gauge gold plated copper wire, for the leafy branch tips.
Pieces of easily manipulated, light weight aluminum mesh served to fill in areas of the tree trunk that needed more solidity & surface area — the “seat” and the thicker roots.
3. Trunk and branch sculpting: Over the wire trunk and heavier branches, I used Aves Apoxie® Clay. A number of excellent two part self-hardening clays are available from the Aves Products web site (listed with sources below).
I chose to use the “Apoxie Clay.” The Aves site suggests that the Aves Apoxie Clay (as opposed to the Apoxie Sculpt) is good if you are sensitive to solvents. It also takes detail particularly well. It’s not quite as strong as the Apoxie Sculpt, but for this purpose it served very well, and had a texture I found pleasant to work with: softer, indeed more “clay” like.
I followed the instructions on the containers, to good effect. I used latex/plastic gloves while hand mixing the two parts of the clay together, saving a lot of hand washing and stickiness. I mixed relatively small batches, as the material begins to set up in an hour or so, and I’m slow.
Keeping water handy for moistening & cleaning finger tips, I put the clay on in sections, perhaps 4” x5” or so, and worked it into the desired shape with fingers & a small favorite tool (very small burnisher, but each to her/his own!) I used water on fingers and a soft paint brush to smooth & refine the surface while it was still workable. A stiff, flat oil-painting brush was good for giving a bit of texture to the surface.
I continued to apply the Apoxie Clay up to a few inches above the seat area of the trunk, where the branches became very thin, 1/4”or less. I felt the clay might easily crack during transport if used on the thin branches, so I set aside the clay, and instead wrapped the wire branches in fiber (from flax yarn, in this case) & a white glue good for sticking porous to non-porous materials (such as Gem-Tac, and Weldbond).
This left the thinner branches flexible, and less crackable. I painted the tree-trunk and branches with acrylics, sealed with a matte acrylic varnish. Good ones for the purpose: “Dead Flat” Decorators Varnish by Polyvine, or Winsor & Newton Acrylic Matt Varnish. (Note: the Winsor & Newton Acrylic Matt also works wonderfully on polymer clays. I’d be cautious and test the Polyvine varnish on polymer before using for that purpose.)
4. Leaves: I began to cut them individually out of silk… then I realized I could either find a faster method, or wait another few years to join NIADA. I went to a local decorator’s shop, and found a good silk Hydrangea, which looked like the perfect victim. I brought it home, dismembered it, and clipped its four-petaled flowers into four separate leaves. They varied nicely in size.
I glued a strip of archival (for the obsessive) tissue paper along each wire branch tip, sandwiching the wire. I cut the tissue strips in to a long, narrow, willow leaf shape. I could then glue the rounded ex- Hydrangea leaves onto the strip of tissue paper, resulting in the leaf pattern you see. I wanted to maintain some translucency in the leaves, and simply glazed them with acrylic paints.
Berries were created by twisting glass beads, on fine wire (30/32 gauge) into bunches, and adding as desired.
And there you have it.
Some sources for the materials mentioned:
Aluminum armature wire: many art stores carry it, or, check under “armatures” at http://sculpturehouse.com/
Aluminum mesh: art stores, or http://www.Amaco.com/jsps/amacohome.jsp under “WireForm Mesh.” Unfortunately, I’ve lost the designation for the specific type I used, but it was the Diamond Mesh-Aluminum, with a 1/4 inch pattern, no.50015T.
Aves Apoxie products: https://avesstudio.com/
Weldbond glue: Home Depot.
Gem-Tac glue: craft stores.
Winsor & Newton Matt Acrylic Varnish:
http://www.artsuppliesonline.com/catalog.cfm?cata_id=403 for W & N info: http://www.winsornewton.com/
And false Hydrangeas… where you find them! Craft stores, decorator shops, florists, and no doubt on line.
For more information about Forest Rogers, visit her website at www.forestrogers.com, or the NIADA Artist Member Contact at www.niada.org/contact.html.


luv the work,it is adorable
i love the style,textures on the work.thank you